10.24.2011

Fall Apple Dip

This is a classic autumn snack that I permit myself to make once a year.


One of those recipes where you mix crisp & crunchy local apples
with
sweet & creamy dip.

This was something else I brought to that baby shower recently helped with (sorry for the lame picture in a dark room!).

I used walnuts this year, but salted peanuts are my very favorite garnish for a sweet & salty yumminess!

Fall Apple Dip
1 (8-oz.) package cream cheese
1/2 cup light brown sugar
1 1/2 Tbsp vanilla
1/2 cup salted peanuts or walnuts (optional)

Beat all ingredients, except for nuts, together in a bowl.  Add nuts, if desired, and serve with apple slices.

10.21.2011

A Different Kind of Cake...(zero calories!)

I recently helped throw a double baby shower,
where I got to make diaper cakes!

Now, I don't really consider myself a crafty person, but I thought it was something I could probably do without too much of a fuss.  :)


I kept them pretty plain and simple,
but you can easily dress up a diaper cake with lots of
baby toys
and 
clothes
and
bottles
and
doo-dads of all sorts.

But I'm not really a doo-dadd-y person.

If you are, we should be friends and you can help me
become more doo-dadd-y savvy.  (?)

(I can't take credit for those cute giraffe pops my friend made!)

I've also seen the rolled-style diaper cakes, but liked the look of this style better, plus the diapers will be easier for the new mom to use (they won't be all rolled and crumpled up).

I used this link as a guideline, but learned some things along the way that I liked better.
So, next time you're itchin' to make a cake but want to cut the calories WAY down...try making a diaper cake.  :)

Non-Rolled Diaper Cake
Makes 1 three-tier diaper cake

-56 Pampers Swaddlers diapers (size 1) (bottom tier-30, middle-20, top-6)
-a 10-in cake pan, to help mold the bottom two tiers & hold in place while wrapping the rubber bands around
-2 large rubber bands (for the bottom two tiers)
-1 medium-sized rubber band (for the top tier)
-cardboard, cut in a circle for a cake stand (I measured this after I made the bottom tier according to how big I fanned out the diapers)
-tissue paper for wrapping the cardboard cake stand
-1 empty paper towel cardboard roll
-tape
-glue (hot glue gun works best)
-ribbon for decorating
-baby toys, clothes, flowers, buttons, doo-dads, etc for embellishments

The link that I mentioned above gives pretty good instructions for the assembly.  
I used all 30 diapers for the bottom tier (I didn't stuff any in the middle) and just used plastic grocery bags to stuff in the middle (I did this for the bottom two tiers).  This also fanned the diapers out a little further, which I liked (you could also stuff blankets or onesies in the middle).
I only had a glue stick for attaching the ribbon, but ended up having to use some tape in the back to keep it together--a hot glue gun would be a much better choice!
All in all, it was a lot of fun to put these together--next time it'll go a lot faster now that I've done it once!

10.19.2011

Mini Vegetable Quiches


Never judge a book by its cover.


...Or a mini vegetable quiche by its top.

Sometimes things aren't picture-perfect for your eyes, 
but are perfectly yummy for our insides (ha).

I made these for a special occasion a couple weeks ago when we got together with some friends for brunch.
Because it was a special occasion, I added bacon.
However, these can easily be vegetarian-ized by omitting the bacon.


When I mixed 'em up, I got on one of my veggie-lovin' kicks and added a few too many veggies, 
which caused my muffin tins to overflow, leaving me with not-so-pretty mini quiches.
Although the mini quiches were fun, next time I make them, I may just throw the batter in a small casserole dish.
Then I can make them without any suppression of my veggie love. :)

*Two side notes: 
1.  I finally just fixed my blog feed!  Become a follower if you'd like to receive updates!
2.  I just added pictures to my Whole Wheat Yogurt Pancakes post, in case you were wanting a visual.

Mini Vegetable Quiches
12 servings
Adapted from Costco Magazine

12 foil baking cups
8 eggs, lightly beaten
1/4 cup skim milk
1/2-1 cup shredded cheese (cheddar or mozzarella are yummy)
1/2-3/4 tsp salt
1/4 tsp black pepper
1 Tbsp olive oil
1/2 cup chopped red onion
1/2 cup diced red bell pepper
1 cup chopped mushrooms
1 cup frozen, diced hash brown potatoes (or pre-baked red potatoes)
1 large handful raw baby spinach, chopped
1/2 lb bacon or sausage, cooked, crumbled, and drained (optional)

In a large mixing bowl, combine eggs, milk, cheese, salt, and pepper.  Set aside.
Heat olive oil in a large skillet over medium heat.  Saute onions, bell pepper, and mushrooms until tender.  Add hash browns and spinach and cook until hash browns are heated through and spinach is wilted.  Remove from heat and stir in meat, if desired.  Place baking cups in a muffin pan and distribute batter evenly among baking cups.  
Bake for 20-22 minutes, or until eggs are set.

10.04.2011

Healthy Fruit & Nut Granola Bars

After indulging in popcorn, ice cream, brownies, and...umm...(do I dare say it?)...bacon (yikes!), I decided it was high time for a healthy post.


I often find myself at a loss for easy, healthy things to have around for my husband to throw in his sack lunch for school every day (and I don't even have kids in school yet...I'm in trouble!).


Granola bars are always easy, but as I stroll down the cereal/granola bar aisle at the grocery store, I literally cringe when I read the ingredients...
(have you seen me there before?  I probably look really awkward--my apologies)
...usually including some type of corn syrup, many unpronounceable things, 
and loaded with sugar.  
Disgusting.

SO, I was really excited when I found this recipe.  I've tried homemade granola bars before...but this is definitely the winner.  It has simple ingredients, takes 5 minutes or less to throw together, 
AND
has the approval of my little (big) school-boy of a husband. :)
It's a perfectly healthy, no-sugar-added, and yummy, addition for anybody's brown sack.


(No more cringing for me--feel free to peruse the cereal aisle once again, void of a certain cringing lady.)

Healthy Granola Bars
9 servings (easily doubled)
slightly adapted from Spark Recipes

1 1/4 cup old-fashioned rolled oats
1/4 cup dried cranberries (or raisins)
1/4 cup dried apricots, chopped fine
2 Tbsp unsweetened coconut
2 Tbsp raw sunflower seeds
2 Tbsp slivered or chopped almonds
2 Tbsp ground flaxseed (optional)


1/4 cup honey
1/4 cup natural peanut butter or almond butter
1/2 tsp pure vanilla extract


Combine first 7 ingredients (oats through flaxseed) in a large bowl.  Set aside.
In a small bowl, mix together honey, peanut butter, and vanilla; microwave for 30-45 seconds until melted (or heat on stovetop).  Add to dry ingredients and stir, evenly coating with the peanut butter mixture.
Press firmly into and 8x8 ungreased dish (I used the back of a spoon sprayed with cooking spray).
Bake at 350 for 10-15 minutes, or until lightly browned.
Let cool completely before cutting into squares.  I like to individually wrap them in plastic wrap--all ready to be thrown in the brown sack!
*Notes:  I like to chop the raisins & almonds up even more for a finer texture for my toddler; it also helps the bars stick together.
I frequently double this recipe and bake in a 9 x 13 dish for about 3-5 minutes extra.

9.21.2011

Cinnamon Popcorn

 I grew up making homemade popcorn with my family for our weekend movie nights.  
My brothers and I had a very precise, two-man (kid) technique to pouring the melted butter over the freshly popped kernels (a dangerous mission if you ask me).

Man #1= the butter pourer
Man #2= the bowl spinner

..and Man #3 (a.k.a. my mom)...the rescuer, who always came to sprinkle the right amount of salt on and mix it all up perfectly and make the chaotic, popcorn-butter mess right again.

It was always such a treat to lay out the green picnic blanket in the family room, 
where we chomped on popcorn out of the designated orange "popcorn bowl," 
sipped homemade milkshakes--my dad's specialty--
and watched some quality Disney.

Always done in jammies, of course, and on Saturday nights, with sponge curlers in my hair for church the next day.
What more could a little girl ask for?  It was perfect.


Needless to say, homemade popcorn holds a place in my heart.
So when our neighbors gave us a Whirley-Pop Popcorn Maker for a wedding gift,
it was love at first sight.

Between me and the Whirley-Pop, I mean.
(you already know of the undying love between me and the boy next door :)

(This is now our designated popcorn bowl :)

Anyway, this recipe put our Whirley-Pop to good use...I think I am finally in the acceptance stage of the grieving process in my farewell to summer,
so I am now welcoming--even embracing--all things warm and cinnamon-y.

"Bring it on.
Boooooo-yaaaahahaha....wooo!"
(Name that Disney movie...here's a little hint.)

Cinnamon Popcorn
Adapted from Tasty Kitchen
6 servings
10 cups popped popcorn (about 6 tablespoons unpopped kernels)
1/2 cup unsalted butter
1/3 cup sugar
1 1/2 tsp cinnamon
1/2 tsp pure vanilla extract
2 pinches salt, to taste

Pour popped popcorn into a large bowl and set aside.  Preheat oven to 300 degrees.
In a small saucepan over medium heat, combine butter, sugar, and cinnamon and stir until butter is melted and sugar is dissolved.  Remove from heat and add vanilla.
Slowly pour mixture over popcorn and stir, using above two-man technique.  :)  Sprinkle on a couple pinches of salt, to taste.  Transfer popcorn to a large baking sheet and bake for about 10 minutes, or until crispy.
Cool before serving.

9.15.2011

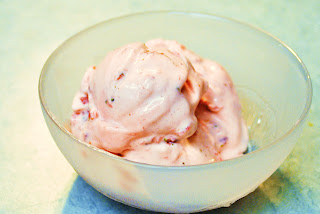
Strawberry Sour Cream Ice Cream

I am desperately holding on to summer.

After such a horrendous, record-breaking, housebound winter...
followed by a cold, rainy spring...
*sigh*

I just haven't fully recovered yet.
(Yes, I'm being dramatic...but winter is dramatic too, which is why we don't get along.
Opposites attract, right?)


Anyway, I found myself panicking this morning when I woke up to not only a cold house, 
but also a baby with a cold. :(
(Summer, are you really leaving me?)

So, to aid me in my grief as I hesitantly bid summer farewell, 
I'm sharing a delightful summer recipe I made on a recent family visit.


...So speaking of opposites, let's talk sweet strawberries and, well, sour sour cream.
A((n) opposite) match made in heaven.

It's definitely rich,
so only a few dainty bites are needed to satisfy even the greatest of ice cream desires.


...
On second thought, my dad was able to have several not-so-dainty bites...
but he is the exception.  :)
(Love you, Dad.)

Summer, I miss you already.


Strawberry Sour Cream Ice Cream
Adapted from The Perfect Scoop by David Lebovitz
Makes about 1 1/4 quarts


1 lb fresh strawberries, washed, hulled, & sliced
3/4 cup sugar
1 cup sour cream
1 cup heavy cream
1/2 tsp freshly-squeezed lemon juice

Combine strawberries & sugar in a bowl and stir until the sugar begins to dissolve.  Cover and let stand at room temperature for about 1 hour, stirring occasionally.

In a blender or food processor, pulse the strawberries (and their liquid) with the sour cream, heavy cream, and lemon juice until almost smooth but still chunky.

Refrigerate for at least 1 hour, then freeze in ice cream maker according to the manufacturer's instructions.
Related Posts Plugin for WordPress, Blogger...